Scenario 3 and Variants.
Wellingtons or Stirlings up against a Ju88C-2.
The Stirlings are used in a low level dash through the Searchlight belt. Fun can be had with the umpire not declaring the altitude advantage until the first fix or tally attempt.
The Wellington is loosely based on No.301 (Pomeranian) Squadron RAF. I couldn't fit the MG code letters on the fuselage.
The Ju88C-2 is from I/NJG 2. This would have been an all black scheme with R4+ codes. National Insignia would have appeared as white only which fits the range of decals I have. Minor green stuff added to the nose to bulk it up to turn it into the solid nose on the C-2
As with all gamers, projects come and go. Models you were thinking of moving on get a new lease of life due to a comment in the Hobby or a movie on TV. This will hopefully be my record of my best endeavours not to start anything new until I have at least completed 75% of what I already have....as if that is ever going to happen ;)
Showing posts with label Manufacturer - Tumbling Dice. Show all posts
Friday, 27 February 2015
Wednesday, 8 October 2014
1/600th Aircraft - USS Constellation Air Wing 1972 for Downtown
90 Per Cent complete
It comprises, with options, 19 Aircraft of which only 15 will be used in any given scenario. Only four are strike aircraft the rest are have complimentary roles needed to get those bombers onto the target and assess the results.
This is a "typical" arrangement of the strike package as a whole.
Which looks like this, with the possible options shown, on the table
The Bomber effort from VA-146. Paul at Tumbling dice sent me some TER from the A-10 kit
With the option of having two of the A-7 replaced with upto two A-6 from VA-165. I haven't done the warning triangles on the jet intakes yet.
RVAH-11 'Viggie' to take the post strike photos for BDA
Strike element with the attendance Close Escort F-4Js
Any 'tron is a good 'tron. Support provided by two EKA-3B
Minor cock up, in that I took the positioning of the rear detail from an early aircraft. When they jamming pods were fitted the Stars n Bars and NAVY are the other way around with the NAVY sitting under the jamming pod. As mine don't have the pods modeled on I will leave these as they are. They also still need the red warning lines added to the jet intake and the tail markings applied (hence 90%)
In all its glory
It comprises, with options, 19 Aircraft of which only 15 will be used in any given scenario. Only four are strike aircraft the rest are have complimentary roles needed to get those bombers onto the target and assess the results.
This is a "typical" arrangement of the strike package as a whole.
- MiGCAP
- Iron Hand
- Strike Force
- Jamming Support
- Post Strike Recon
Which looks like this, with the possible options shown, on the table
The Iron hand section comprises F-4J and either an A-6 or an A-7.
The Bomber effort from VA-146. Paul at Tumbling dice sent me some TER from the A-10 kit
With the option of having two of the A-7 replaced with upto two A-6 from VA-165. I haven't done the warning triangles on the jet intakes yet.
RVAH-11 'Viggie' to take the post strike photos for BDA
MiGCAP provided by VF-92
Strike element with the attendance Close Escort F-4Js
Any 'tron is a good 'tron. Support provided by two EKA-3B
Minor cock up, in that I took the positioning of the rear detail from an early aircraft. When they jamming pods were fitted the Stars n Bars and NAVY are the other way around with the NAVY sitting under the jamming pod. As mine don't have the pods modeled on I will leave these as they are. They also still need the red warning lines added to the jet intake and the tail markings applied (hence 90%)
In all its glory
Monday, 15 September 2014
1/600th Aircraft - USN MiG Killers - Finished (as far as I am going anyway)
As the title says, these are completed to a standard I am happy to game with. Couple of errors such as decals slipping during the varnish stage and might need to get redone in the future. The VF-96 aircraft are still in the old scheme as well which really shows and there are a couple of places where the decals aren't the size I wanted. They are more consistent than other projects
I have put them in Squadron groups rather than day by day chronology:
All done (in a very hazy shot)
The Singletons (VF-111, VF-161, VF-33, VF-31, VF-103, VF-213
VF-161, VF-111, VF-33
VF-213, VF-31, VF-103
VF-143, VF-92, VFMA-333
VF-21
VF-142 and VF-161
VF-142
VF-161
VF-96 and VF-114
VF-96 (the old scheme really needs replacing)
VF-161
I have put them in Squadron groups rather than day by day chronology:
All done (in a very hazy shot)
VF-161, VF-111, VF-33
VF-213, VF-31, VF-103
VF-143, VF-92, VFMA-333
VF-21
VF-142 and VF-161
VF-142
VF-161
VF-96 and VF-114
VF-96 (the old scheme really needs replacing)
VF-161
Wednesday, 10 September 2014
Thursday, 21 August 2014
USN Aircraft - VF-114 1972
Part of the MiG killers allotment of aircraft are a couple of VF-114 "Aardvarks". As this is an interesting scheme to do (bright orange stripes) I used my lunch hour to see what it might look like using a quick mock up (and if it went well it would become the production version).
TD later F-4 model used a a base for the J Model. The lettering decals are from my standard set. The orange stripe however I scaled from some artwork. The problem is that it doesn't match the TD moulding as a result is about 2mm too short and also the black line isn't definitive. As it is too short it also comes together in a point rather than the square end that the real VF-114 aircraft had. Therefore I need to overscale the black lines to make it stand out more as well as look at the length and fitting.
As I have used a clear decal the walkway decals which I normally fit will have to be cut before fitting and then butt up against the stripe otherwise it will show through.
Other things that need to be done is the Kitty Hawk lettering needs to be resized as it is too large. The remainder of the decals went on okay and I gave everything a coat of Microsol to make sure it sank onto the moulding as well as it could.
I have also found that making the decals into PDF and then printing isn't a problem so I might put some up as a share later for those who fancy a go.
Anyway, back to work and I will strip this one back down (NAVY, Stripe and Kitty Hawk can all come off leaving the remaining decals in place) and see if I can get a better set made up tonight.
Friday, 11 July 2014
1/600th Aircraft - US Navy F-4s - Part 3
Tailcodes and artwork are going to be the biggest time consumer on this project. A quick check through the books confirmed this as the only straightforward tail codes are for VF-114 on the Kitty Hawk with a simple NH scheme and then VF-103 and VF-31 on the Saratoga with AC tail codes.
This is what the end state will hopefully look like once I add it to the model, noting that I can't print white and the yellow and red require white to achieve the colour, so this might have to be a two or three stage decal job with the arrow first on a white background, then paint the rest of the stabilizer in Gull Gray and then add the AC codes. I have a similar problem with the VF-31 decal (and in fact any of them that need a bright colour :) )
1/600th Aircraft - USN MiG Killers - Part 2
The text and numbers for all the aircraft has been designed which didn't take too long. Just playing around with the actual fit of decals vs correct sizes as the TD model detail is exaggerated (as is anything at this scale). Paul over at TD very kindly sent me the new air frames over this morning so I now have all the metal needed and might spend an hour or so this afternoon cleaning up the mould lines etc.
This is the current state of progress
This is the scaling that I have managed to get to with the decals and gives a rough approximation of the sizes I am using. I have snap to grid on so I couldn't quite get the guides to match up to the font so the NAVY 6.0 might be an inch either way (at this scale).
I am out for dinner tonight and have family commitments over the weekend so nothing expected before sunday night, but MIGHT get a test print run off in draft just to check I haven't cocked anything up.
Wednesday, 18 December 2013
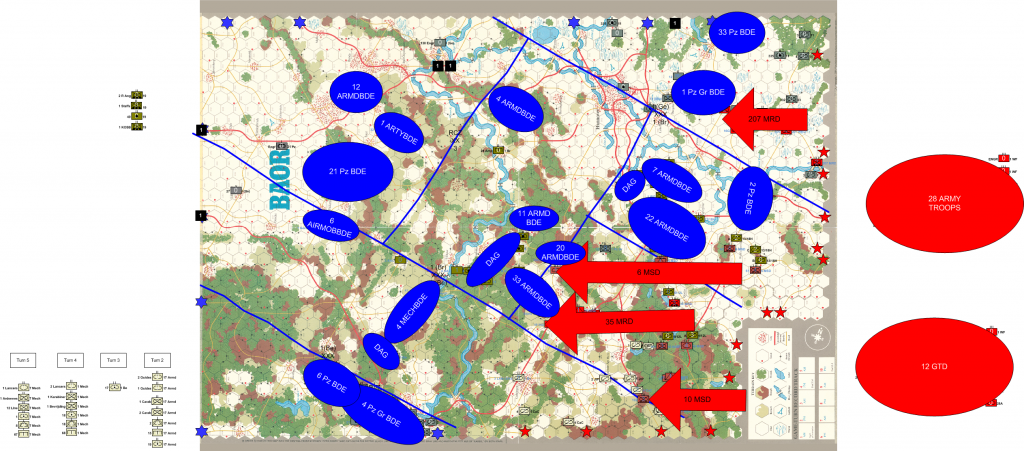
Central Front - BAOR - Turn 1 Phase 3
End of Op Phase 3 of turn 1 which equates to about 1200Z on the first day of World War III
The Belgians have won the race to the bridges and have also managed to get 3e Lancers into a blocking position in front of the lead MRR. Means that all my hard work painting Brits up has come to halt as it seems that Belgians are going to be where most of the action is going to be (less the 4 ARMDDIV meeting engagements for 20 & 33 ARMDBDEs
The next turn will see the WP 2nd Echelon armies arriving as well as 12 GTD for 28th Army and 35 MRD trying to push on. 10 MSD should also be able to push the Belgian Screen back as well allowing them to support the flank, but cannot really see them getting into a tangle for the Kassel crossings. 6 MSD I think is going to get a rough handling from the British but will need to watch their flank from the 2nd Ech stuff moving on.
There is a gap opening up between 1 and 4 ARMDDIV which could be exploited but that will need some timing to get right and 12 ARMDBDE may arrive in time to stop that avenue of approach. However, it may be time to launch some air assault now that the Brit deployment is firming up to cause it some problems.
Main problem I have is that I have a birds eye view of both sides and it is too easy to match the moves of one side. I haven't worked up any decision matrices for soloing this proper so it is being done on the fly. But I have managed to get a couple of "realistic" scenarios out of it so far.
Friday, 13 December 2013
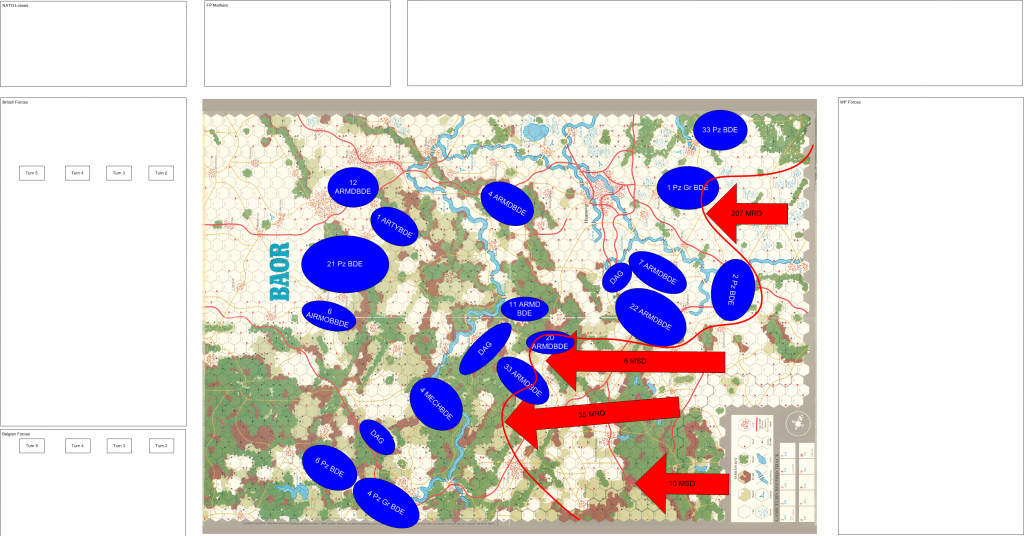
Central Front - BAOR - Turn 1 Phase 2 (NATO Ph1)
So the turn of NATO to respond.
I chose to ignore the NATO paralysis rule as I feel that it doesn't appy in 1985.
I have chosen to include some NATO Op graphics to show some possible theoretical deployment areas and use these to force the NATO forces into some realistic game options. The original BAOR game allowed NATO forces to be intermingled for example the 2nd Panzer Grenadier Division units around Kassel would have been allowed to move into the area southwest of the Harz, ignoring the fact that this was the Belgian zone of Operations.
Anyway, we are where we are on this. NATO hasn't managed to get as far forward as I would have liked. FWIW If I do this again I would allow the NATO forces a 6 MP deployment move (but end on their FP Side).
Situation for NATO is a mix of good and bad.
In the North 207 MRD is in for a hard time as it will attract the attention of probably 3 Brigade equivalents of the WG I. Ge Corps forces. That is what I deployed it there for to draw off forces from the South.
6 MSD is a little bit bogged down facing 9/12L and 10 MSD is having real trouble clearing out the Belgian recce forces.
35 MRD looks the best option for the WP player as it is almost completely unopposed and NATO are going to have to push elements of 4 ARMDDIV hard to contain it.
1 ARMDDIV looks to be in a good position and will be able to hold its sector again if the WP don't swing North in their coming turn.
3 ARMDDIV are suffering from their rear basing but are likely to be able to reach their area while 1 and 4 ARMDDIVs take the brunt of the fighting.
Central Front - BAOR - Turn 1 Phase 2
6 & 10 MSD are suffering from Friction and are stalled somewhat. 6 MSD have now run into 20 ARMDBDE from 4 ARMDDIV
207 MRD is doing its job of being bait.
35 MRD despite showing early promise has now bumped into 33 ARMDBDE from 4 ARMDDIV.
Both sides look tired so probably will call end of turn and we will move to the afternoon of Day 1 with the WP still having air superiority. Whether I decide to throw some air assault in this turn remains to be seen. Both sides are looking for reinforcements, for NATO the next Belgian Brigade is due and the WP the 12 GTD is about to follow up probably behind 35MRD, but as it can be committed last it will reinforce the success (as per doctrine)
Game combats as meeting engagements which might make the table top……
RHG/D and 1 RRW up against the TR and MSR from 6 MSD (might try that as a 2,1 BG (RHG/D) vs the TR and a 2,2 BG (1 RRW) against the MSR or 3,1 RHG/D and 1,2 RRW (if people want to try out the different BG combinations feel free)
SCOTS DG up against an initial thrust by the 35 MRD Ind Tk Bn which has been thrown forward as a Forward Detachment with the 69 MRR adding its bulk to the engagement.
33 MRR/207 MRD against 14 Pz Bn supported by a Coy from the Recce Bn.
Wednesday, 11 December 2013
Central Front - BAOR - Turn 1 Phase 1
BAOR
Campaign – Solo War Diary Race for the Weser
Initial Air
Supremacy 21.2 – Decided to replace this with a simple roll off against turn
number. So on Turn 1 they have air
supremacy but roll a D6 if the roll equals the turn number they are on then the
following turn it is normal Air Supremacy.
This increases the Fog of War as this is being played solo.
21.4 Warsaw Pact March
Order. The deployment into Battle formation should
only occur when attacking at least a NATO Battalion. As such the WP must follow the March order
until such a combat occurs. This keeps
the WP loosely aligned with doctrine.
RAG counter does not exist but may be replaced with a SP Arty Bn which
can then be stacked with a WP Unit.
21.6 NATO
Corps Artillery. This SSR is not in force
as there is no way of assigning the requisite orders to this in real life
(AFAIK) so each Nation can only call upon assets of its own nationality.
22.4 Warsaw
Pact paradrop options. With the
realignment of the 1 Be Corps units which were based in FRG in 1985 Option B
only affects units of 1st Infantry Division.
Entry
Hexes:
WP set up
opposite the entry hexes prior to the WP Pre-Emptive strike rolls.
207 MRD
will enter in one column using:
2751 :41 MRR, 33 MRR, DAG, Ind Tk, AT, 400MRR, 16G TR
6 MotorSchutzenDivision
enter in two columns using:
1246: 61MRR, 63 MRR
1247: 62MRR, 62 TR, DAG, Ind Tk, AT
10
MotorSchutzenDivision enter in one column using:
0644 : 103 MRR, 101 MRR, DAG, Ind Tk, AT, 102 MRR, 10 TR
35 MRD
enter in one column using:
0944 : 64 MRR, 69 MRR, DAG, Ind Tk, AT, 83 MRR, 219 TR
SSR 21.5 Warsaw Pact Pre-Emptive
Strike. The WP elected to conduct
strikes against:
Celle/Scheuen
331 (6-1=5) down
to a 4 as it is a battalion
333 (2-1=1)
334 (2-1=1)
Braunschweig
21 (4-1=3)
22 (4-1=3)
23 (3-1=2)
25 (1-1=0)
1 RTR (1-1=0)
1 AAC (5-4=4)
14 (4-1=3)
11 (2-1=1)
Augustdorf
211 (2-1=1)
212 (6-1=5) down
to 4 as it is a battalion
213 (2-1=1)
214 (3-1=2)
215 (3-1=2)
217 (5-1=4)
7 Aufkl (6-1=5) down to 4 as it is a battalion
1 QLR (1-1=0)
3 RHA (1-1=0)
3 RTR (1-1=0)
4/7 DG (5-1=4)
RHG/D (2-1=1)
4 AAC (1-1=0)
Air Power
Segment (4) so WP will have Air Superiority next turn as well.
12 AP
1 Interdiction Point 3942, 3936, 3521, 3520, 1130, 1131,
2101, 2901, 3939
Situation at the end of the WP 1st Movement Phase.
Sunday, 3 November 2013
1985 Campaign - West German Forces (General modelling)
Part of the campaign idea that I was pursuing was a WP attack with limited NATO reaction time. Not the attack out of barracks that was feared but something with less than 7 days notice and with possibly only 12 - 24hours actual warning of combat operations. As such the WG elements scattered across the 1 Br Corps operational area would have to compete with British units moving Eastwards while they complete their moves to the I Ge Corps area North of the British.
My WG forces have the 3 colour scheme, which is slightly early for 1985 but I do recall some camouflage schemes being present on the 332 Pz Gr Bn marders at Wesendorf in the period 1983 - 1984. IIRC the Div HQ of 1 Pz was in green though during Ex Lionheart in 1984.
A sample of the equipment types and general schemes present ahead of actual units being added to the blog latter.
Gepard
Overall shot of general equipment types
Auflkarung Units
Gepard (again)
Luchs
Close up of the GHQ Model
Paint scheme is overall Vallejo reflective green. Black Grey and Calthan Brown then a light dry brush with Russian Green. The map symbols come from Tom Mouat.
Saturday, 2 November 2013
1985 Campaign - 6mm Terrain (2)
More housekeeping means finding some of the old pictures of my 6mm terrain which is used in the campaign.
Early game on in the 6mm projects life. A 4 x 4 board at my gaming buddy's house with simple roads and terrain items. I hadn't made any roads or rail sections at this stage
Oblique shot of the above
From a slightly different angle
And the other side
Forward Security Element and Main Body up against 22 Armd Bde
Early shots on the 6" x 6" BUA I shamelessly copied from Timecast since updated with a new scheme
Following a bit of scratch building on the roads and finding out that the Hornby track planning set is a perfect match in this scale.
Roadsigns, again an idea take forward from discussions with Barrie at Timecast during the Reading show. I found a German font which meant that I could make up anything I wanted and then just print out on card.
Interim playing surface (yes it is a blanket) with some slightly reworked roads
Track planning set with a home made bridge using Plastruct
Which meant I needed a rail crossing
Roughly the amount of rail system I ended up with.
1st Ge Panzer Recce defend the railway embankment
Luchs
Top View
So glad I found these pictures as I thought they were lost when I broke my old PC. Luckily my backup regime worked. I just forgot where the backups were.
Subscribe to:
Posts (Atom)